

Being a mom is challenging enough, but then you have to also look good while doing it too. Even if you’re not a mom, I bet you’re a busy person and you don’t have time to always be camera-ready. There’s no reason to walk out the door in the morning without a little something to make you feel put together and look your best—especially if it only takes 5 minutes!
After years of working with professional make up artists on my photoshoots, as well as when I’m ON camera from time to time, I’ve picked up some tips and tricks along the way that have made my life easier. After 12 years of working as a fashion stylist with these pros, I finally feel like I’ve mastered an easy and natural-looking daytime makeup routine, which has become essential with being pregnant and having a toddler.
Sure, you could always YouTube how to put on makeup, but most of the time they don’t know what the heck they’re talking about. Most of what you see on YouTube/Instagram these days, especially on the Kardashians, is NOT what actual makeup artists do. That’s what drag queens and theater people do. Don’t be intimidated, as it’s not for every day (or really ever in your life).
I’ve lined out below a step-by-step guide that makes it easy to do for anyone. Better yet, I’ve included ONLY CLEAN BEAUTY products so if you’re pregnant or just a conscious consumer, you can see that there is no reason to put toxic chemicals on the biggest organ of your body, your skin, which absorbs as much as you digest!
MY 5 MINUTE MOM FACE (WITH ALL CLEAN BEAUTY!)
STEP 1:
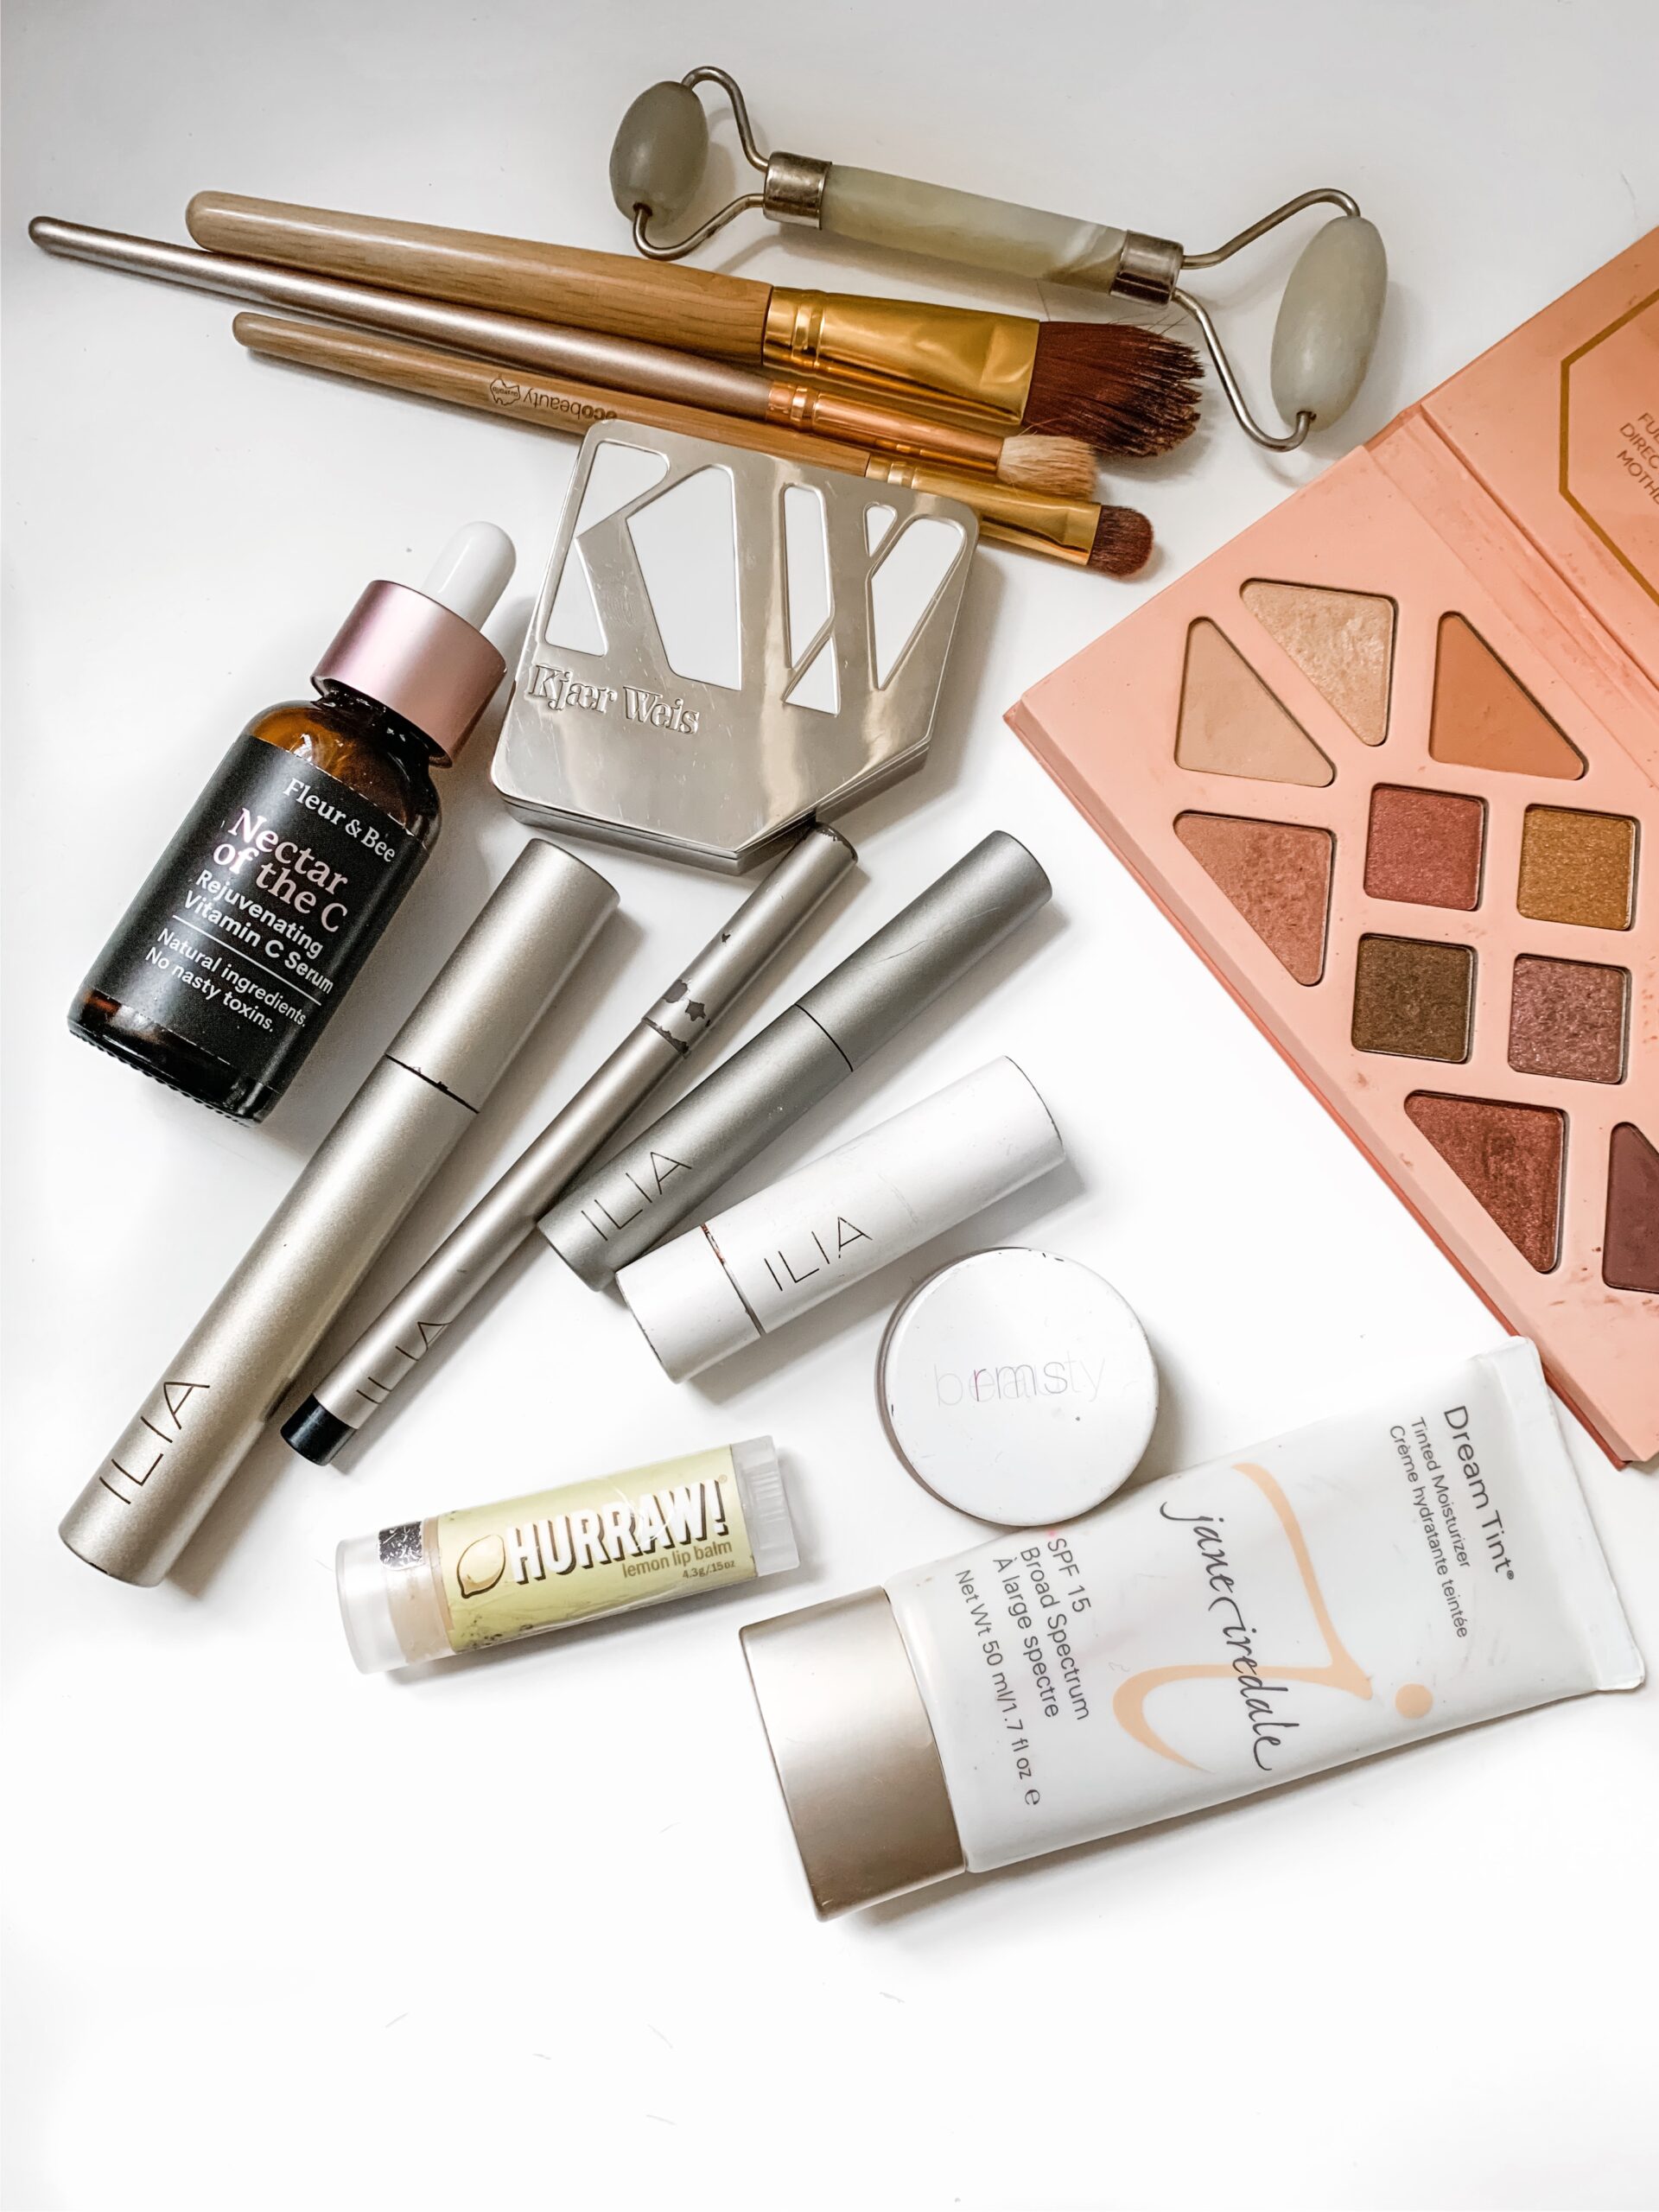
Vitamin C Serum
After you cleanse (I just use micellar water to not dry out my skin) and tone, then you should be doing this very important step, which will brighten your skin and actually minimize scarring/discoloration and lock in your moisture for the day. I’ve been into this *non-toxic* vitamin c serum from Fleur & Bee which is surprisingly affordable.
Rub a dropper full in your hands to warm it up and then pat on your face, avoiding the eye area. You can also use on your neck and even the back of your hands. I like using a jade roller and/or gua sha tool after to wake up my face, drain any puffiness, and help the serum absorb.
STEP 2:
Tinted Moisturizer or BB Cream
To me, this is the most important step. I loathe a face full of makeup, so I love a product that lets my skin shine and does it all. I’ve been using this tinted moisturizer from Jane Iredale for years and always go back to it. It has SPF, so it also saves a step and covers quite a bit despite being so lightweight. I probably could use the “light” color being my skin is so pale this time of year, but I used “medium-light” here, which is still actually pretty light.
STEP 2B:
Concealer/Spot Foundation
Tinted moisturizer may be enough coverage for you, but for me, I’ve been battling acne scarring for a while now. While I’ve been fortunate to find a professional way to tackle my scars, I’ve been pregnant for most of the time that I’ve had these recent scars, so I’ve had to find more natural methods, which don’t do quite the job.
Foundation is way too heavy for my face or my liking and concealer doesn’t tend to do enough, so I often use a this non-toxic foundation from Kjaer Weiss, as more of a concealer, which gives me the coverage I need in certain areas without covering too much of my skin. It’s a bit pricey, but I’m still on my first one from over a year ago and you can refill the packaging at a more affordable price, so it’s worth every penny!
STEP 3:
Blush
Okay, so this step is really both blush AND eye (and can even be lip too!). This RMS Beauty pigment is my HOLY GRAIL product and it makes an every day face THAT much easier and prettier. I avoid powders for day because they can be too heavy and make my skin look older (need all the help I can get these days!). It’s also fool-proof and quick, so you can blend it in with your (clean) fingertips on your cheeks, eyelids and even lips.
If you want a little more color for day or feel that you want to minimize redness, opt for a shadow from Aether Beauty, which is completely natural, eco-friendly and flattering on everyone.
STEP 4:
Liner
I’m not big into a lot of liner for daytime, but I cannot live without this clean beauty Ilia liner (I use it in black) now that I discovered it. My trick is to get as close to the lash (go under the lash instead of over), so you can’t see the line. It looks more natural and fills in between your lashes, rather than creating a harsh, unnatural line.
STEP 5:
Mascara
This is probably one product I won’t leave the house without because I’m so fair and blonde that it makes a huge difference when I put it on. It’s hard to find an effective natural mascara that doesn’t irritate your eyes or end up under your eyes by the end of the day. This mascara from Ilia is my favorite after trying SO many different kinds. Allure even gave it their seal of approval.
The trick with mascara is to get it in the base of your lashes and WIGGLE it outward, focusing on the inner corners, not the outer ones. This will make it quicker to get more volume and also make you appear more awake. Then you can go over the edges of your lashes vertically for extra oomph.
STEP 6:
Brow
I have barely there brows so this is an essential step for me, but many people overlook this one! Brows are like the picture frames of your face, if you neglect them, it’s like hanging a poster in your home and not a piece of art. Even if you have dark brows, a brow gel to groom and fill in can make the world of a difference. I’m really into this brow gel from Ilia that makes it so easy to achieve #browgoals without looking like you tattooed them on.
STEP 7:
Lips (prep and tint)
It’s really important to prep your lips before you put anything on them. Nothing is worse than running out the door, throwing some lip color on only to find it caking and flaking on you not long after. I like rubbing my lips with a towel/washcloth to get the dead skin off first. Then, as every makeup artist does, I prep with a balm to add moisture. This under $4 natural balm from Hurraw does the trick and I can’t get enough of it this winter.
Then I use a natural-looking lip color to complete my look. This Ilia lip conditioner is HANDS DOWN MY FAVORITE LIPSTICK OF ALL TIME. They sadly discontinued the color I’m wearing here, but “Nobody’s Baby” looks pretty similar and what I’d buy next. I put on their signature red color “Crimson and Clover” if I want a bit more drama to my look, but it’s so light that it never looks overdone and never cakes, so it fades naturally.
Of course you can tailor this routine for you and your needs, but this is what works for me based on what my makeup artist friends have taught me along the way and hope it can be just as easy for you.
As always, send me any questions/feedback you may have!
xoLiz
FAQs
How can I look put together when I only have a few minutes to get ready?
Focus on the products that make the biggest impact. A little coverage, mascara, blush, and a lip color can go a long way. I love my products that have multiple functions in one. Merit and Jones Road have several of these and you can find my favs on my list here. The goal isn’t perfection. It’s helping you feel like the best version of yourself, even on busy mornings.
Do I need a full face of makeup every day?
Not at all. Most women don’t need a complicated routine to feel polished. (As a mom, I get it, we just don’t have the time!) A few well-chosen products can help you look refreshed and confident without spending a lot of time in front of the mirror. My routine is literally 5 min, so I know it’s possible.
What are the best makeup products for busy moms?
Look for products that are easy to apply, blend quickly, and work double duty. Multi-purpose products can simplify your routine and make getting ready feel much less overwhelming. I have my favs already listed for you on my ShopMy.
Is clean beauty worth the switch?
That decision is personal, but many women appreciate having products with ingredients they feel good about using every day. If clean beauty aligns with your values and performs well for your needs, it can be a great addition to your routine.
How can I simplify my makeup routine?
Start by identifying the products you use every single day. If something has been sitting untouched in your makeup bag for months, you probably don’t need it. A streamlined routine often feels easier and more realistic to maintain.
What makeup helps you look more awake?
A little concealer, mascara, and blush can make a noticeable difference. These products help brighten the face and add a healthy, refreshed look, even after a less-than-perfect night’s sleep. But don’t sleep (no pun intended) on the skincare routine. My skincare is even more essential to looking more awake and refreshed than my makeup. Here’s my fav products.
Is tinted moisturizer enough for everyday wear?
For many women, yes. Tinted moisturizer can help even out skin tone while still looking natural. It’s a great option when you want light coverage without the feel of a full foundation. But, don’t forget that sunscreen underneath!
How do I create a natural makeup look?
Focus on enhancing your features rather than covering them. Lightweight products, soft color, and a less-is-more approach often create the most natural-looking results.
What’s the biggest mistake women make with everyday makeup?
Many women think they need more products than they actually do. Often, a few products you love and use consistently will serve you better than a drawer full of products you never reach for.
How often should I replace my makeup products?
It depends on the product, but mascara, liquid products, and anything used around the eyes should be replaced regularly. Keeping your makeup fresh can help with both performance and hygiene.
Can I still wear makeup if I want healthier-looking skin?
Absolutely. The key is finding products that work well for your skin and removing them properly at the end of the day. Healthy skin and makeup don’t have to be mutually exclusive.
What should I keep in my makeup bag for everyday touch-ups?
A lip product, concealer, and pressed powder or blotting papers are often enough for quick touch-ups throughout the day. Keeping it simple makes it easier to stay consistent.
How can I make my makeup routine feel less overwhelming?
Give yourself permission to keep it simple. You don’t need every trending product or every step you see online. A routine that fits your lifestyle is usually the one you’ll stick with.
What beauty products are worth investing in?
If you use a product every day and it consistently performs well, it may be worth the investment. Focus on products that make your routine easier and help you feel confident.
Can a simple beauty routine still make a difference?
Absolutely. Sometimes the simplest routines are the most sustainable. A few minutes each morning can help you feel refreshed, polished, and ready to take on the day.
SHOP THE *CLEAN BEAUTY* PRODUCTS IN THIS POST
Disclosure: Fleur & Bee, Aether Beauty and Follain have sent me products in the past, but with no obligation to post. I genuinely LOVE these brands and hope you do too. Please also note that I’m able to keep making informative posts for you through the help of affiliate links, so if you like something I post, please purchase it through here when possible. Thanks! xx